Getting Started
Get into Garrison in a couple of minutes: pick a client, make an account, then create or join a server. Everything works the same across web, desktop, and Android.
1. Get a client
Garrison runs anywhere. Use whichever fits, your account and servers follow you across all of them.
Desktop (Windows)
The featherweight native app. Tray, global push-to-talk, game overlay, and signed auto-updates. Download the installer and run it.
🤖Android (APK)
Sideload the APK (enable "install unknown apps" for your browser the first time). iOS is on the roadmap.
🌐Web app
Nothing to install, the full app runs in your browser. Great for trying it out or for locked-down machines.
The download links above point at the official hosted build. If you're connecting to a self-hosted Garrison instead, just open that server's URL in your browser (or point the desktop app at it), see Self-Hosting.
2. Create your account
Garrison uses its own accounts, there's no third-party login and no email required to start. On the sign-in screen choose Register and pick:
- Username: 3-32 characters, unique on that server.
- Password: 8+ characters. It's hashed with argon2id; the server never sees it in the clear.
- Display name & (optionally) a preferred language for live translation.
Want extra protection? Turn on two-factor authentication (TOTP) any time under Settings → Security. You'll get 10 one-time recovery codes, keep them somewhere safe. See Security & Encryption.
3. Join or create a server
Joining with an invite
Most people start by joining a guild's server. Someone with permission generates an invite link (or a short code). Open the link, or paste the code into Join Server, and you're in. Invites can be set to expire or to allow only a limited number of uses.
Creating your own
Click + Add a server, give it a name (and optionally a logo), and you'll get a fresh
server with a #general channel and an @everyone base role. From there you can:
- Add categories and text / voice channels, and drag to reorder them.
- Set up roles & ranks, or apply the one-click rank-ladder preset (Leader → Vice Leader → Officer → Veteran → Member → Recruit). See Roles & Permissions.
- Invite your guild and start talking.
4. Find your way around
| Area | What's there |
|---|---|
| Server panel (left) | Your current server card (click it to switch servers), the channel list, a direct-messages launcher, and a settings gear. Unread and mention badges show here. |
| Channel sidebar | Categories, text channels (🔒 marks encrypted ones), and voice channels with live occupants. |
| Chat area | Messages, replies, reactions, pins, threads, the composer, and the pinned-messages bar. |
| Member list (right) | Members grouped by rank, with role colors. Click anyone to open their card. |
To talk, click a voice channel to join, then use the voice bar to mute/deafen. On desktop you can bind a global push-to-talk key that works even while a game has focus. See Voice & Video.
5. Switching and managing your servers
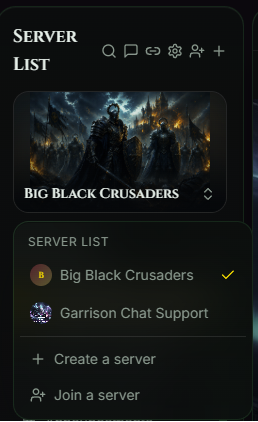
Your current server sits in a card at the top of the left panel, showing its banner art. Click that card to open the server switcher: a list of every server you belong to, with a check mark on the one you're viewing. Pick any to jump straight to it, or use Create a server / Join a server right from the same menu.
Garrison remembers your last-viewed server, so refreshing the page or reopening the app drops you right back where you left off, instead of resetting to the first server in the list.
Brand-new account? You'll start with no servers and a welcome screen. Just create your own or paste an invite to join one, and it shows up in the switcher.
Changing a server's settings
Open Server Settings from the gear icon in the panel header (you'll see it if your role has Manage Server). It's split into tabs:
| Tab | What you can change |
|---|---|
| Profile | Rename the server and set its chat background image. It's also where the owner can delete the server. |
| Templates | Apply a ready-made channel layout in one click. See Set Up Your Server. |
| Roles | Roles, ranks, the rank-ladder preset, colors, and per-channel permissions. See Roles & Permissions. |
| Members | Assign roles, kick, and ban members. |
| Emoji | Add your guild's custom emoji. |
| Invite | Generate invite links, with optional use limits and expiry. |
To tweak an individual channel or category (rename, delete, visibility, or permissions), hover it in the channel list and click its own settings icon, or right-click it.